

Pipe Handrail Installation
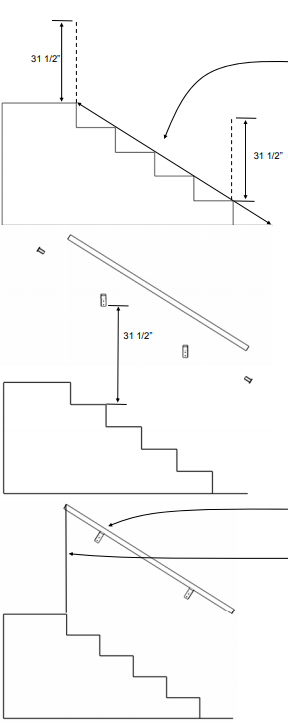
Measure from the nose of the top step diagonally to the bottom landing as shown. This measurement is the amount of pipe needed for a straight run of the handrail. Cut handrail to length. If longer than 8′, two pieces of pipe will need to be spliced together.
Measure up 31 1/2″ vertically from several stair nosing and mark on the wall. These marks will become the height of the bottom screw hole of the handrail bracket (PHRB).
Along the line intersecting the marks on the wall, locate or install a stud or suitable backing and install the handrail brackets using one screw. If installing into wood, use the supplied 2 #12 x 2″ wood screws.
Handrail brackets need to be installed within 12″ of the ends of the handrail and no longer than 48” between brackets. Check your local building code for bracket spacing.
Rotate handrail brackets in direction of the slope and lift previously cut handrail onto brackets. Align the top of handrail with top stair nosing and place onto handrail brackets. Secure handrail to upper and lower brackets with the supplied 2 #10 x 3/4″ tek screws. Install the remaining 2 #12 x 2″ wood screws through the second hole of the bracket into the wall.
Note: For attachment into wood studs or blocking, install handrail brackets 12″ from the end of the rail and a maximum 48″ apart. An additional handrail bracket may be required.
Residential installation only. Commercial applications may differ.
Always check with local building codes prior to purchasing and installing this product. Edges may be sharp after cutting. File the edge for a good fit and finish. Wheelchair ramps ADA/Compliance may require special applications (Check local building codes).These instructions will provide an installed handrail height of 36”.


0 Comments