
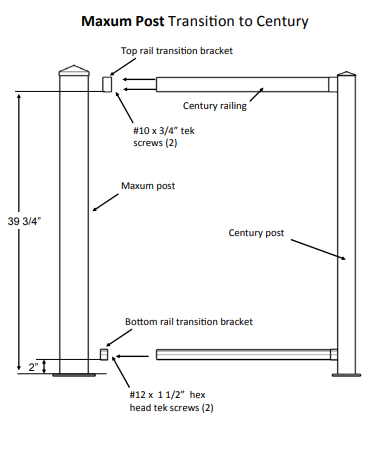
Attaching Century Top Rail to the Scenic Railing System or a Maxum Post
Installing the Top Rail Bracket onto Post
Step 1 Measure from the top of the post base plate up the post 39 3/4” and mark this location. Locate the top rail transition bracket ensuring the bottom of the bracket is aligned with the 39 3/4”
mark. Take care to ensure the bracket is centered on the post.
Step 2 Mark the center of each of the slotted holes located inside the bracket. Set the bracket aside.
Step 3 Predrill two pilot holes using a 1/16” drill bit at the marks you just made. Locate the bracket ensuring the bottom of the bracket is aligned with your mark at 39 3/4” above the top of the base plate.
Step 4 Install 2 #10 x 3/4” tek screw into the pilot holes, do not fully tighten. Check that the bracket is level, centered, straight and at the correct height. Tighten screws securely (DO NOT OVER
TIGHTEN).
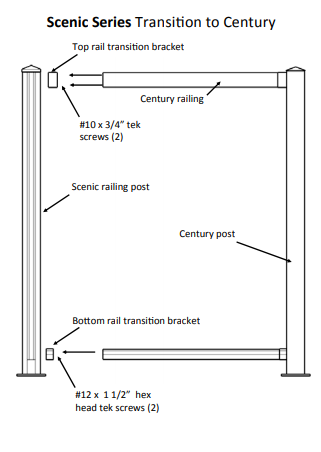 Installing the Bottom Rail Bracket onto Post
Step1 Measure from the top of the post base plate up 2” and mark this location. Locate the bottom rail transition bracketensuring the bottom of the bracket is aligned with the 2”
mark. Take extra care to ensure the bracket is centered on the post. Mark the center of each mounting channel located inside the bracket. Set the bracket aside.
Step 2 Predrill a pilot hole using a 1/16” drill bit at the marks you just made. Locate the bracket ensuring the bottom of the bracket is aligned with your mark at the 2” height above the top of the
base plate. Install 2 #12 x 1 1/2” hex head tek screws through the bracket and into the post. Check that the bracket is at the correct height and centered. Tighten screws securely (DO NOT
OVER TIGHTEN).
Step 3 Install top and bottom rail and begin installing the Century System.
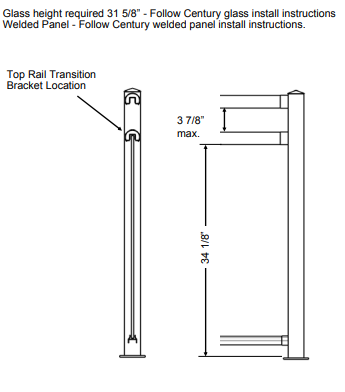
Double Top Rail Option
Installing the Top Rail Bracket onto a 42” Post to create a Double Top Rail
Step 1 Measure from the top of the post base plate up 34 1/8” and mark this location. Locate the top rail transition bracket ensuring the bottom of the bracket is aligned with the 34 1/8” mark. Take care to ensure the bracket is centered on the post.
Step 2 Mark the center of each of the slotted holes located inside the bracket. Set the bracket aside.
Step 3 Predrill two pilot holes using a 1/16” drill bit at the marks you just made. Locate the bracket ensuring the bottom of the bracket is aligned with your mark at 34 1/8” above the top of the base
plate.
Step 4 Install 2 #10 x 3/4” tek screws into the pilot holes, do not fully tighten. Check that the bracket is level, centered, straight and at the correct height by aligning the bottom of the bracket at
your 34 1/8” mark. Tighten screws securely (DO NOT OVER TIGHTEN).
Step 5 Install the bottom rail then the top rail with picket insert into the lower top rail sleeves, then install the extra top rail in the remaining top rail sleeves. If using pickets for the 42” system
cut down to 31 7/8”. Continue installing the railing as per the Century Railing instructions.
Glass height required 31 5/8” – Follow Century glass install instructions
Welded Panel – Follow Century welded panel install instructions.
3” Privacy/Windwall Post
Installing the Top Rail Bracket
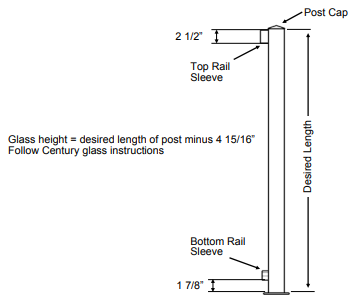
Step 1 Once Post is cut to desired length and before reinstalling the post cap, measure 2 1/2” down from the top of the post and mark this location. Locate the top rail transition bracket with the bottom of the bracket aligned with the 2 1/2” mark. Take care to ensure the bracket is centered on the post.
Step 2 Mark the center of each of the slotted holes located inside the bracket. Set the bracket aside.
Step 3 Predrill two pilot holes using a 1/16” drill bit at the marks you just made. Locate the bracket ensuring the bottom of the bracket is aligned with your mark at the 2 1/2” mark from the top of the post.
Step 4 Install 2 #10 x 3/4” tek screws into the pilot holes, do not fully tighten. Check that the bracket is level, centered, straight and at the correct height by aligning the bottom of the bracket is at
your mark. Tighten screws securely (DO NOT OVER TIGHTEN).
3” Privacy/Windwall Post
Note: Pickets for 36” system or stair pickets can also be used. (if using stair pickets, you may require an extra package)
Installing the Bottom Rail Bracket
Step1 Measure from the top of the post base plate up the post 1 7/8” and mark this location. Locate the bottom rail transition bracket ensuring the bottom of the bracket is aligned with the 1 7/8” mark. Take extra care to ensure the bracket is centered on the post. Mark the center of each mounting channel located inside the bracket. Set the bracket aside.
Step 2 Predrill a pilot hole using a 1/16” drill bit at the marks you just made. Locate the bracket ensuring the bottom of the bracket is aligned with your mark at the 1 7/8” height above the top of
the base plate. Install 2 #12 x 1 1/2” hex head tek screws through the bracket and into the post. Check to ensure the bracket is at correct height and centered. Tighten screws securely (DO NOT OVER TIGHTEN).
Step 3 Install top and bottom rail and begin installing the railing as per the Century Railing instructions.
Residential installation only. Commercial applications may differ. Always check with local building codes prior to purchasing and installing this product.


0 Comments